Friday, February 24, 2012

Pink Grapefruit Sandwich Cookies!

In an effort to keep up with blogging (a creative outlet for me) I decided to look at my pinterest boards today to see if anything on my food/recipe board jumped out begging for me to make it.  As luck has it I saw this page pinned.  I had a quick look at the ingredients and as soon as I realised I had all of them on hand I went for it.  The kids were occupied with toys so I was good for maybe 10-20 minutes ;)   Confections of a Foodie Bride is one of my favourite food blogs.  It just so happens that we have the same love of a good margarita and this wonderful blogger has many recipes for different margarita's, many of which I have pinned to make in the (hopefully near) future! 

Here is the juice of half of one of my giant Texas grapefruits :)


After zesting and juicing the grapefruit I combined the sugar, butter and part of the zest (saving a tablespoon for the cream filling).  Am I the only baker that never thinks about taking my butter out and letting it sit?  When I decide to bake something it's usually a spur of the moment type thing and I have to resort to softening my butter in the microwave.  I feel like such a slacker but it seems to soften up fine, unless of course I forget and end up with a melted buttery mess all over the microwave :/


While the sugar/butter/zest was mixing I blended the dry ingredients (Flour, cake flour, baking powder, salt) with a whisk.


When it was well blended I added the egg yolk and mixed it well.  Then I added half of the dry to the wet ingredients, which made it kind of dry but that was remedied by the 1/4 cup of fresh grapefruit juice that I added.  I finished it off with the remainder of the dry ingredients and it came together nicely.  It was a soft dough but SO simple and you could really smell the citrus-y goodness of the grapefruit.  I tipped it out onto plastic and wrapped it up and put it in the fridge.  If you look REALLY closely you can see some of the specks of zest.  Mmmmmmm!


While my cookie dough was in the fridge I got started on the cream filling.  First I mixed the powdered sugar, zest and butter (nuked again ;) ).


The instructions said to mix this on high for 3-4 minutes.  I found I had to keep it on medium to keep the sugar in the bowl and not all over my kitchen.  After a couple of minutes it came together though and was a very stiff consistency, that is when I added the grapefruit juice and it blended up so nicely.  The juice had some little bits of pulp that had sneaked in, so yummy.  There was an option to add food colouring, I opted to leave that out as it already had a nice pink hue to it and I prefer not to add colours if not necessary.  I think they are lovely just as they are but if you were using these for a themed party the food colouring could take them that extra step to make them more special. 


The consistency was perfect, firm but not too firm and again that beautiful aroma from the zest that made it smell fresh rather than sugary!

After the oven was preheated and the filling blended I took the dough out of the fridge (not sure if I gave it the full 30 minutes or not) and rolled it out.  Seeing the specks of zest made me happy, and the dough smelled divine!


I discovered that I don't actually own a 2 inch round cookie cutter.  I have PLENTY of shaped cutters and the closest I found was a flower shaped cutter.  It was the perfect size so I just went with it.  It made really cute little cookies.


I baked the cookies at 350 degrees for 8 minutes, any longer and I think they would have been over cooked.  They came out just right, not completely soft but not crunchy.  You could smell the citrus aroma when I opened the oven to pull them out.

I used a frosting gun (?) that I purchased in the Wilton section at Wal-Mart.  As you can see it has a bit of a crack in it from me tightening it too much but it still works fine.  A frosting bag is just as easy but because I have to pull out the couplers, bags and tips I usually get lazy and just grab this.  It worked well for the cookies.


This was the fun part, squishing them together and then trying to figure out the best way to photograph them.  I am a total amateur when it comes to photography of any kind and taking pictures of my food is helping me get a better idea but wow I have a long way to go. 


Wednesday, February 22, 2012

Fat Tuesday!

I have to be honest, I never remember when it is Fat Tuesday but thanks to Facebook and blogs I follow I was reminded with enough time to plan for pancakes for dinner for my crew.    We don't eat pancakes a lot.  There are seven of us and making pancakes seems to take FOREVER, add on that having to cut them up for the littles AND keep an almost 14 year old boy with enough food on his plate, it just doesn't always make sense for us.  In fact I can't remember the last time we had pancakes, it has to have been over a year ago!

So I used to have a fantastic recipe, I would make the dry mix and keep it in a jar and just add the wet ingredients to it when we wanted pancakes.  It was so easy, which I needed because as I already mentioned it seemed like such a big task making pancakes for the whole fam. 

So I went searching for a good recipe.  I first went to one of my favourite foodie blogs to find a recipe and was going to make these pancakes.  I printed up the recipe and headed for the kitchen only to realise that I didn't have buttermilk OR sour cream in the fridge.  UGH.  OK so back to the computer to search for anotehr recipe that didn't require those ingredients and I found this recipe.  So the picture is not appetizing but it had 5 stars so I decided to give it a shot.  I am SO glad I did.  They were delicious.  I doubled the recipe because I have two teens, a hubby and three kids 10 and under.  We go through A LOT of food!  I also decided to serve bacon, homestyle potatoes and grapefruit sections. 

First I mixed the dry ingredients together, flour, baking powder, salt and sugar


Then I put eggs, milk and vanilla into the bowl of my stand mixer


and mixed it on med/high until it looked frothy


Then I added the dry ingredients to the went and mixed on medium until it was well blended, scraping the side of the bowl as needed.


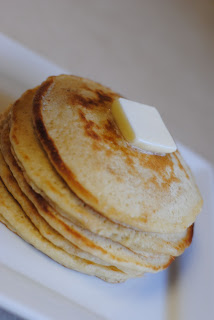
I melted some butter onto my electric griddle and poured 1/3 cup pancake batter per pancake.  Those bubbles of butter around the edges give the pancakes that delicious crispy edge.  Yum.


A pat of butter on top


of course you can't forget the REAL maple syrup.


I decided to bake the bacon, I had never cooked it that way before and I love it.  I won't ever fry bacon again!  I just layed it on a baking sheet and popped it in a oven preheated to 400 degrees, I simply watched it and turned it over when it looked like it was ready.  It tasted really good and since it was baked that means it was good for us right?! :)


we did pat it off with paper towel to remove the excess oil, it tasted a lot less fatty than normal which we all seemed to prefer


Here is the recipe DOUBLED
  • 2 large eggs
  • 2 1/2 cups milk
  •  4 teaspoons vanilla 
  • tablespoons butter, melted or 6 tablespoons vegetable oil (I used butter)

  •  3 cups all-purpose flour
  • 1 1/2 teaspoons salt
  • teaspoons baking powder
  • tablespoons sugar (for diner-style pancakes) or 1/2 cup instant malted milk powder (for diner-style pancakes)

Directions:

  1. Beat the eggs, milk, and vanilla until light and foamy, about 3 minute at high speed of a mixer (I do this step in blender and mix the rest in bowl with a large whisk).
  2. Stir in butter or oil.
  3. Whisk the dry ingredients together and gently, but quickly, mix into the egg and milk mixture.
  4. Let the batter relax while griddle is heating (or overnight in refrigerator) The batter will thicken upon resting.
  5. Grease and preheat griddle.
  6. The griddle is ready if a drop of water will skitter across the surface, evaporating immediately.
  7. Drop ¼ cupfuls of batter on the lightly greased griddle.
  8. Cook on one side until bubbles begin to form and break (this is the time to add anything like berries, chocolate chips, etc), then turn the pancakes and cook the other side until brown (turning only once)

Tuesday, February 21, 2012

TWD - Chocolate Truffle Tartlets

This weeks TWD recipe is Chocolate Truffle Tartlets found in Baking With Julia by Dorie Greenspan on page 382.  If you don't own the book and would like the recipe you can find it at this weeks hosts blogs awhiskandaspoon , spikebakes,  Good Eats and Sweet Treats and CookBookHabit.  We are cooking two recipes per month from this book, one more challenging than the other, the tartlet recipe is this months challenging assignment.  Just the fact that it was the challenging of the two had me nervous.  I have made a few tarts before and eaten my fair share so I was looking forward to tasting these! 

I wasn't sure my kids would appreciate the biscotti so I was planning on omitting it completely.  In the end I decided to make half of the batch with biscotti and the other half I folded in freeze dried raspberries, hoping that they would give it the texture that they would be missing without the biscotti.  Besides, raspberries and chocolate are a sure fire winning combination.....right?! 

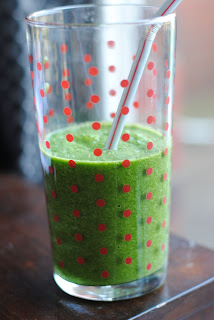
My tartlet pans made it to me in the mail from Amazon on Friday, but for some reason my hubby and I decided that this past weekend would be a great time to do a 48 hour cleanse.  I'm not really sure what we were thinking, it was pure torture.  This was the longest 48 hours of my life and I craved every food under the sun while we consumed food like pictured below.  Don't get me wrong, I LOVE green smoothies, but this was kale, pineapple, flax and mint.  That's it.  So it was chewy and tasted pretty much of raw minty kale. Blech! 


I decided to make the dough on Sunday and make the tartlets on Monday so that hubby and I could enjoy them fresh with the kids. 

I gathered my ingredients and got to work on the dough.  It came together so much faster than I thought it would.  I chose to do the method using the food processor.


Nice cold butter ready to be added


I am not sure I had the right texture here but this is after the butter was pulsed in


I was particularly nervous about this step, I was worried it wouldn't come together but it was really quite simple.  Phew!


Here is my finished dough ready to be wrapped and chilled!


I got a bit of a late start today (Monday) but thankfully again the tarts had several steps but were actually pretty simple.  I was relieved, I am not sure why I let a recipe make me feel anxious :) 

Here is the egg yolks and sugar mixture being folded in with the melted chocolate and butter


The buttery yellow egg yolk/sugar mixture


Folding the chocolate mixture into the remainder of the egg yolks and sugar


Here are the tartlets ready to go in the oven. Pictured below is one of the tartlets with freeze dried raspberries.


I put them in for 10 minutes but they didn't quite look done, so I went for the additional 2 minutes and I think they came out just right, maybe slightly under but hopefully that translates into soft delicious chocolate and not raw egg :)

Here are some pictures of the finished product, they look so good but I am making the family wait until after dinner!


Review time!  The opinions were positive!  Since I had three with biscotti and three with raspberries I cut each one in half so we could all try both kinds.  I wasn't expecting the biscotti to soften as much as it did but I was pleasantly surprised at the texture.  The raspberries had a nice chewy texture and tart flavour, it really helped cut the richness of the chocolate which was a bit much for me.  Hubby liked the one with biscotti more and one of the kids definitely liked the raspberry one better.  After asking the other kids/taste testers I think the consensus is that the biscotti didn't add much flavour and they liked the raspberry tarts more.   Both versions were delicious and this recipe will be repeated for sure. 

I hope my fellow TWDers enjoyed this recipe as much as I did!  Next month we are making Rugelach and Irish Soda Bread!  We are all looking forward to both recipes in my house.

Monday, February 13, 2012

Happy Valentine's Day

With three family birthdays before Valentine's Day and one a month after the holiday almost gets passed over in the chaos of daily life.  I wanted to add a little bit of decoration to the house for the day of luuurrrve.  Our five year old loves to celebrate each and every holiday and he is strangely excited about this particular one!

It's not much but I'm ok with that :)

Tuesday, February 7, 2012

TWD - White Bread

How exciting, this is the first recipe for TWD Baking with Julia!  I always looked forward to Tuesdays to venture around to many of my favourite blogs out there and see their TWD posts.  Now I have the opportunity to post my own.  Yay!   I made the bread twice, well actually I made the dough twice and the cards just weren't in my favour the first time through.  I have made lots of bread before but I was just not on my game and ended up giving up and throwing the dough away.  Don't let that discourage you, it was ALL ME!  The recipe is so easy to follow and is quite simple to make, it was just one of those days I suppose. 

If you would like the recipe you will find it here http://someonekitchen.blogspot.com/ or you can buy Baking with Julia so it will be available at your fingertips anytime :)

Here is the only progress picture I took. I used the proof setting on my oven to proof the dough most of the way, then took it out to preheat the oven.  I was so grateful for that setting because the kitchen is currently a bit too chilly for me to get a good environment for dough to rise......brrrrrr


I tortured two of my boys a little while I took pictures of the finished product.  They love homemade bread (who doesn't?) and couldn't wait to slice off their own piece to critique inhale ;)


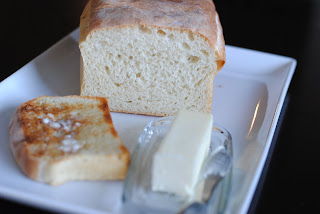
I baked one in an aluminum bread pan and one in a silicon and I actually like the consistent shape of the silicon pan more.  The top of the other one was kind of wonky, but it still passed the taste test!

This is my preferred method of consumption!  TOAST!! Covered in melty REAL butter!


I am so glad to have our first baking assignment behind us, don't get me wrong, it was fun but with so many unknowns about how it all works I had a little additional anxiety on top of the baking part of the assignment.  No worries, one day I will be a seasoned TWD veteran!  Thanks for getting a new group going Jules and Laurie 

Monday, February 6, 2012

Birthday!

My oldest child turned 15 today.  It's so bittersweet.  I remember holding her as a newborn after giving birth in the water and feeling like I could conquer the world with my newly discovered superpowers!  Now she is a freshman in highschool, independent, confident, intelligent, athletic and FUN!  I can't believe I have been a mother for 15 years, makes me feel terribly old.  The two year old running around seems to make me feel the same way!

My lovely daughter isn't a big fan of cake so she asked for something different this year, it is a twist on an Australian dessert called Vanilla Slice.  I served it in bite size pieces at our Australia Day party and I guess she REALLY liked it :)  I took my inspiration from this recipe http://www.taste.com.au/recipes/16037/passionfruit+vanilla+custard+slice which is actually quite different from a traditional vanilla slice.  I plan on making a traditional version at some point, yum.

I did cheat a little and used Bird's custard mix that I purchased in the British food section of my local grocery store.  Making custard isn't my favourite thing to do and by using the mix I eliminate the stress of scrambling the eggs, which causes me great anxiety.

I am looking forward to enjoying this later!  Hopefully I can figure out how to get a candle in it :/